Posts Tagged With: parenting

Playing With Lady Bugs

lady bugs in search of aphids

What kid doesn’t love bugs?  Butterflies, caterpillars, rollie pollies and lady bugs are some of the most treasured critters in the garden.  I even know a child who has a deep love and respect for spiders.  Of course not every child loves bugs yet many do and lady bugs are among the most enchanting of bugs and are very approachable for most kids.

lady in hand

Recently I brought in a big bag of lady bugs to play with at the preschool.  (I purchased them at our local flower nursery.)  Before we let the lady’s go in our garden, we started out our lady bug exploration with a book all about the lady bug life cycle, Grub To Lady Bug by Melvin and Gilda Berger.

There are great pictures of lady bugs in different parts of their life cycle in this book including the larval stage when they look nothing like that lady bugs we are used to seeing.  The kids really were engaged reading about these familiar little insects.   While reading we talked about how many legs a lady bug has and about how lady bugs help our gardens be healthy by eating bugs that harm plants like aphids; aphids who suck all the nice juice out of plants and make them feel bad.  At this point one of our littlest girls who is just 3 years old, exclaimed “like the Grouchy Lady Bug!”

~ A Simple Art Project ~

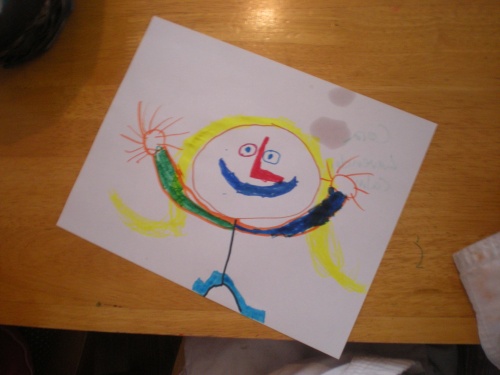
Has you may know from my post about salt dough finger prints, I love to capture the precious cuteness of little fingers, hands and feet.  So as part of our lady bug exploration we made lady bug pictures with the children’s little red finger prints for the lady bug’s body.  The kids drew in the details of lady bugs often including six legs and even flowers for the lady bugs to protect.

Here are some wonderful examples of our art work:

~ Lady Bug Release ~

Finally the big moment came when we released the lady bugs into our garden.

The kids squealed and giggled as lady bugs crawled out of the bag in droves.

releasing lady bugs

They crawled everywhere, up my arm, all over the ground and on our spinach plants.

Super duper buggy fun!

lady's on spinach

We spent the rest of the morning gently holding lady bugs and watching them find a new home among the plants.

A Cherry Tree In Trouble ~

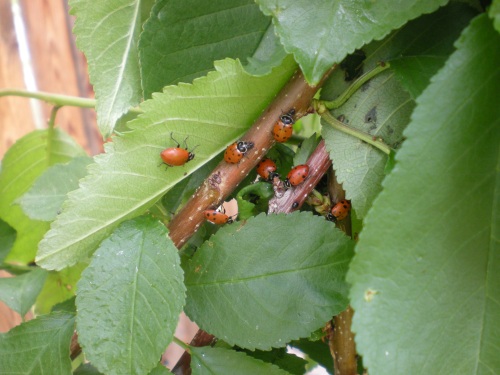
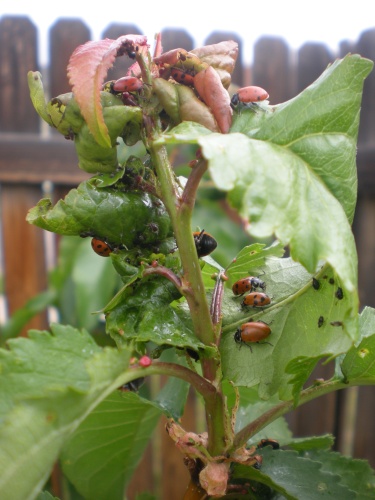
About a week after the release at school, my daughter and I discovered our cherry tree at home covered in black cherry aphids and we knew just what to do!

Off we went to our local nursery to get some more lady bugs.

coming out of the bag

Here are the lady bugs coming out of the bag onto our poor cherry tree!

 We let them go all over the tree and we could see the lady’s immediately getting to work chowing down on those aphids.

lady bugs finding aphids

It has been less that a week and the tree already looks so much better.

Like it’s energy is coming back, the leaves are greener and it seems to be standing stronger.

My daughter had a great day playing with the lady bugs and running back over to the tree every now and then to check on their progress.

Have you ever used lady bugs to control pests in your garden?  I would love to hear how it went for you.

For More Buggy Fun Check Out ~

Shared On:  Eco-Kid’s TuesdayThe Kid’s Co-opIt’s Playtime!Tender Moments, Friday’s Nature Table, Kid’s Get Crafty

Categories: Gardening, Insects, Lesson Plans For Preschool And Home, Science Exploration, Science Investigation | Tags: , , , , | 5 Comments

Adventures With Earthworms

Many happy days were spent stalking bugs when I was a little child.  I had an array of bug catchers and I knew where all the good places were to find a new pal.  My often caught favorites were roly polies.  I also sought after treasured lady bugs, butterflies and caterpillars which were hard to come by and when I would find one, I would be enchanted with my imagination completely sparked.  So, can you guess what one of my favorite things to do with kids?  Play with bugs of course!  Many, many summer days have found my girls and I “hunting bugs” and going on “roly poly” walks with bug catchers in hand. a wormy friend

The Helpful Earthworm

The preschool I teach at has a wonderful garden that the kids help to grow every summer.  They get to help plant, water and even pick food for the healthy lunches and snacks we serve. This spring we spent a couple weeks studying a couple beneficial friends for our garden, lady bugs and worms!  Naturally when we were done learning and reading we added some lady bugs and worms to help our garden grow.  Worm in it's new home

“Ms. Angela!  Did you know worm poop is dirt?”

After a nice little discussion about earthworms and how they help enrich our soil enabling plants to grow healthy and strong, we continued our study of worms by making a worm farm.  There are a large number of sites to find information on making your own worm farm, with much more detail than what we did.  Here is a quick run down of what we did if you want to make something super simple.

MYO Worm Farm

Materials ~

  • Earthworms:  I got a huge amount at our local garden centers ~ more than enough to make 2 worm farms which we did, one for school and one for home.  
  • Dirt
  • Sand
  • Worm Food: Things like grass clippings, leaves, food bits, oatmeal, tea leaves and coffee grounds, shredded newspaper.
  • Water
  • Container For the Farm:  We used a salad green container.  You know the kind that has washed lettuce in it?
  • Dark Paper

Instructions ~

Layer the dirt and sand in your container to make distinct layers so you can see the soil get all mixed up by the worms.  We even used oats for layering at home because we didn’t have sand.

DSCN4364

Add the food bits to the top of your worm farm.

Here we used a bit of old grass clippings and dandelion flowers.

food bits

Dump your worms in and watch them bury themselves deep into your farm.

Check it out, so very many worms!

adding the worms

Give your farm enough water to keep it moist but not water-logged.

Put a lid on your farm making sure to poke holes in the top so the worms and the farm can breathe.

Cover the sides of the farm with dark paper to encourage the worms to come to the sides of the container.  If you are lucky, you may see the dirt/sand layers get mixed up and little worm tracks along the sides.  We got to see lots of worm tracks one year, but sadly not this year.

Keep your farm in a nice coolish place (but not too cool) and check periodically to see what your worms are up too and to make sure they have enough water and food.

When you are done enjoying your farm, release the worms into your garden!

worm being released into the garden.

We also read this wonderful book to help us learn more about worms:

Diary Of A Worm by Doreen Cronin

This book offers a humerous way to look at worm life and learn about worm facts as well as how worms help our planet.

Wishing you lots of wormy fun!

For more buggy fun visit Playing With Lady Bugs

Shared On:  The Kid’s Co-op, Eco-Kid’s TuesdayIt’s Playtime, Kid Lit Blog Hop, Tender Moments, Friday’s Nature Table

Categories: Gardening, Insects, Lesson Plans For Preschool And Home, Science Exploration, Science Investigation | Tags: , , , , , | 9 Comments

Mindful Crafts & Activities For Happy Kids

Finding meaningful ways to engage children in becoming aware of and exploring their emotions is an important step towards raising confident, happy kids.  And the last few weeks the kids and I filled our time together breathing deep, talking about our emotions and playing!  I would like to share some of the wonderful projects we did that helped us engage our whole-selves, become aware of our emotions and find ways to center ourselves.

These projects are perfect to do with young children and even have complete lesson plans for those of you working with a group of kids.  Most of the projects have a bit of science thrown in while all of them offer kid-approved fun and creativity!

An Aromatic State Of Mind

Conduct a science experiment with essential oils to see what oils insight certain feelings.  Then create a unique piece of art work inspired by an aroma of your choice!

Happiness

Happiness inspired by sweet orange essential oil.

Flower ‘n’ Spice Play Dough Mandalas

Create a beautiful fragrant meditative mandala from lovely botanicals.

Flowers, spices and berries pressed into a base of lavender scented playdough for a calming, centering activity.

Flowers, spices and berries pressed into a base of lavender-scented play dough for a calming, centering activity.

Meditation Friends

Create a special mind jar with a friendly face.  This project helps kids learn to breathe and slow down with they feel out of sorts.

Silly friends for helping kids center themselves.

Silly friends for helping kids center themselves.

Meditation Friends II

A special twist on Meditation Friends that allows for even more personalization of your child’s special new friend!

New colorful friends with lots of kid chosen personalitiy.

New colorful friends with lots of kid chosen personality.

Yoga Play With Babar’s Yoga For Elephants

Simple yoga play with a favorite elephant!  We used this super fun book to guide us through a morning of giggly yoga.

Silly yoga fun!


Do you have any special ways to help kids learn about emotions or mindful ways of how to engage themselves?  I would love to hear about them and give them a try!

Wishing you lots of peaceful fun!

Categories: Aromatherapy For Kids, Fun Crafts, Herbal Tips And Tricks, Herbs For Kids and Mamas, Lesson Plans For Preschool And Home, Meditation And Yoga, Mindful Self Care, Practices For Intentional Living | Tags: , , , , | Leave a comment

Soothing Herbal Bath For Irritated Muscles & Nerves

Frustrated, angry muscles and nerves plagued me over the past few days leaving me all sore and aching.  When I am sore I always try to fit in a nice hot soak in the tub.  Even with just epsom salts and hot water, I usually feel so much better after soaking.  This time I made my bath even more soothing with the following blend of salts and herbs ~ oatstraw to ease my nerves and rosemary for muscle soreness.  It worked wonders!


Make Your Own ~


In a cloth or muslin bag wrap:

  • 1/4 to 1/2 cup of dried rosemary leaf
  • 1/2 cup oatstraw

oatstraw filled bag

Toss the bundle in the tub and fill with the hottest water from your faucet.  Let the herbs steep in the tub until the water is cool enough for bathing about 15 to 30 minutes depending on the heat of your water.  The water will turn a buttery light yellow.

Next Add:

  • 1 to 2 cups Epsom salts
  • 1/2 cup baking soda
  • 5 drops ginger essential oil
  • 5 drops rosemary essential oil
  • 2 drops vetivert essential oil

My vetivert essential oil has turned into a thick syrup oil so I had to patiently wait for each drop to slowing make it’s way out of the bottle but it was so worth it!

After this bath I felt relaxed, centered and less soreness.  I took my bath quite hot and only stayed in for about 15 minutes, it was like soaking in an herbal hot springs.  Then I got out and laid on the floor with my feet on the sill of an open window.  I laid there breathing deep and relaxing.  As my body cooled down the tension drained out of my muscles.  I felt so calm and peaceful.  My muscles and nerves are finally nourished, letting go of tension…

Relaxedly yours…..

If you are following me on the Nourishing Mama Mission, this is the second bath recipe to add to The Art of Bathing.  Thanks for reading and happy bathing!

Categories: Bathing, Essential Oils, Mama Care And Empowerment, Natural Family Care, Nourishing Mama Mission, Oatstraw, Practices For Intentional Living | Tags: , , , , , | 2 Comments

Meditations Friends II ~ The New Kids On The Block

Last year I made these silly centering Meditation Friends with the kiddos at the preschool.  We had so much fun that we decided to make them again but with a new twist to make them even more engaging and personable.  Just like last year started our day reading Peaceful Piggy Meditation which introduces the idea of a meditation jar.  On we went from there to make our own special meditation jars with personality!  

These helpful friends are based on an activity at the end of this amazing, fun book. My six-year-old loves this book. We re-read it often when she is going through a hard time in her life and it seems to really speak to her.

buddies

New to the idea of a meditation jar?  Here is how it works  ~

A meditation, or mind jar, is a jar filled with liquid, like water and glitter.  The child shakes the jar which sends the glitter spinning and spiraling.  The glitter is like a busy mind, and mind full of thoughts maybe even negative thoughts that swirls and feels crazy.  Has the glitter settles down and the child watches it breathing deep into their belly, they can focus on the glitter and let their mind settle down.

These new kids on the block have a special something added to them~ we created layers in the bottle by adding oil colored with a bit of food coloring to the water.  This makes it take longer for the contents to settle down giving the child more time to breathe and calm down.  It also makes the liquid a bit more sparkly.

swirling sparkles

Swirling Mind

What you need to make your own ~

  • Bottle or Jar with water tight lid (I used plastic water bottles to prevent breakage but glass would work fine as well.)
  • Water
  • Oil
  • Food Coloring
  • Glitter or Glitter Glue (Glitter glue will make it take longer for the “thoughts” to settle down.  Use warm water if you choose to use glue)
  • Googly Eyes
  • Decorations (We used peel and stick foamies)
  • Ribbon or Yarn
  • Fabric Scraps
  • Hot Glue Gun

creation

Instructions ~

  • Fill the bottle half/half with water/oil, or you can vary the amounts ~ we did more water than oil with our friends.  
  • Ask the child to pick out their favorite color from the food colors and add a drop or two to the bottle.  The oil and water, of course, won’t mix and the food coloring will color one layer giving you a nice contrast and making it more exciting to shake the meditation friend and to watch it settle down.  
  • Next add glitter or glitter glue and secure the bottle shut.
  • Then have the child decorate their bottle to look like a face with googly eyes and any other materials you have on hand.  I like to use peel and stick foamies because, well, they are easy!    You can also glue on the face but plan for drying time and that the faces may fall of fast.
  • Finally give the new friend a hat by securing a piece of cloth on top of the bottle with hot glue and ribbon or yarn.

Easy Peasy!

friends   Shared On:  It’s Playtime!, Kid’s Coop, Kid’s Get Arty

Categories: Lesson Plans For Preschool And Home, Meditation And Yoga, Mindful Self Care, Parenting | Tags: , , , , , , , , | 2 Comments

Blog at WordPress.com.