Medicine Making

How To Make A Hydrosol

hydrosol1

To me the scent of wild things, of plants and flowers is truly enchanting and brings great joy to my life.  Essential oils and hydrosols capture a bit of that magic for us humans to enjoy any time.   Hydrosols are the aromatic water that is created during steam distillation of essential oils.

Hydrosols are different in their healing properties than aromatherapy spritzers where essential oils are simply added to water.  This is because in addition to small amounts of essential oil, hydrosols also contain water soluble healing compounds.  Among these compounds are plant acids which lend themselves beautiful as toners for the skin.  Hydrosols are generally considered to be gentler and safer to use than their essential oils counter parts.  According to Sagescript hydrosols “contain the beneficial products of essential oils plus more and in a less concentrated, safer form.”

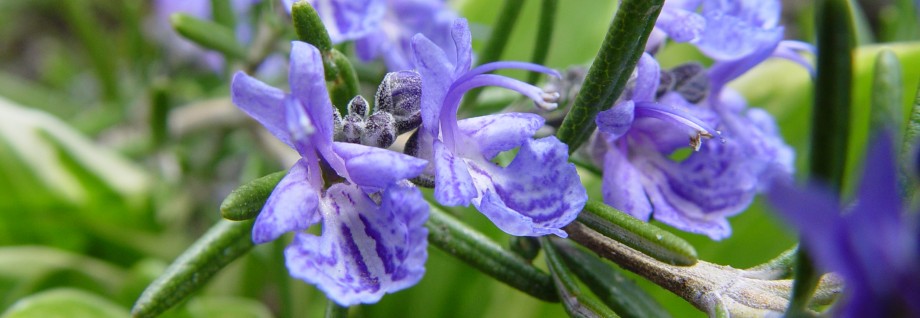
You can use the following method* to make homemade hydrosols from any number of fresh plants and flowers.  Consider using roses (of course!), lavender, calendula, lemon balm, catnip, rosemary and any other fragrant or soothing plant.  I think chamomile would be especially nice.

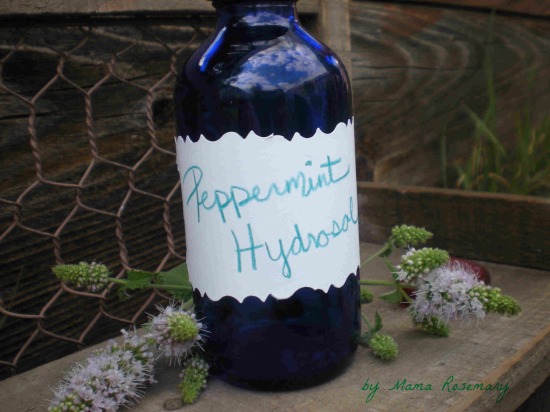
Today we are making peppermint hydrosol.  The good folks at Mountain Rose Herbs say that peppermint hydrosol is great for cooling down on a hot day and that it is “it is particularly helpful for abrasions, hot spots, and as a facial toner.”  I think it will make a perfect spray or compress for cooling down on a hot day.

~ Materials ~

  • Large pot with a lid, a pot for canning works great for this.
  • Small bowl or container to go inside your pot to collect the hydrosol.
  • Something heat-proof to stand the smaller container on inside the large pot, a jar rack works perfectly for this.  If you don’t have one of these don’t despair.  Try using heat-proof ramekin instead.
  • Water, distilled or filtered
  • Ice cubes
  • Peppermint (or other plant material)

~ Method ~

Place the rack or ramekin in the bottom of the large pot and put the small bowl or container on top of the rack/ramekin.

still1

Next fill the bottom of the large pot with plant materia.  You want the plants to reach up to the smaller bowl.  Then fill with water until the plant material is just barely submersed.

still2

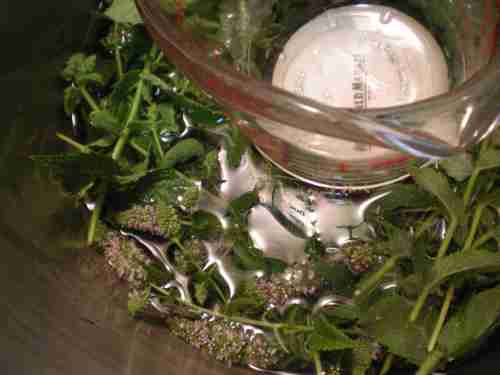
Finally put the lid to your larger pot upside down on top of the large pot and fill it with ice cubes.

still3

Heat this whole set up just enough for the water surrounding the peppermint to steam but not boil.  Let it work it’s magic for 20 minutes or so.  We used a clear lid so we could watch the hydrosol condense!

~ How It Works ~

The water will steam the plant material carrying all the goodness from the plant into the air.  The steam collects on the lid of the pan and condenses due to the ice cubes.  Because the pot lid is upside down, as the steam turns back into a liquid the liquid is directed to drip down into the smaller bowl.  This liquid is your hydrosol!  Pretty cool, uh?

Please store you new hydrosol in a dark glass bottle in the refrigerator.

Enjoy!

~ How to get kids involved with this project ~

If you have read my blog for long, you know that sharing herbs with kids is a great passion of mine.  So of course, getting them involved in this fun project is a big plus for me.  Here are a couple of ideas for sharing the fun with little ones!

  • harvestingmintHave them help you harvest the peppermint.  Explain to them that cutting the mint right above the point where two leaves sprout off the stem helps the plant to grow two new stems.  This is because there are baby leaf buds nestled in right above each individual leaf.
  • Ask the child to help you set up your still.  And share with them what is going to happen.  This is a great time to talk about water and all of its forms.  The liquid water in the big pot will heat up and turn into gas or steam.  This is like a big peppermint infused cloud.   The solid water in the form of ice cubes will help the steam cool down and “rain” into the bowl.
  • Explore your new hydrosol together.  Spray it on yourselves and talk about the effect on your body and mind.  Taste it and cook with it.  Make lotions together too!

For more fun with mint join me at our summer herb camp where we have a whole lot of magical minty ideas!

* Jeanne Rose’s Herbal Body Book is where I found this great way to make your own hydrosols.  I stumbled upon this awesome book years ago when I was a teenager.  For weeks I coveted and saved until I could purchase it and bring it home with me.  My first sojourn into making hydrosols with this method was way back when.  I made the most beautiful rose water right in my family’s kitchen.  So incredible!

References: 

Categories: Aromatherapy For Kids, Herbs For Cooking, Herbs For Kids and Mamas, Hydrosols, Kitchen Creations, Medicine Making, Science Exploration, Summer Herb Camp | Tags: , , | 1 Comment

There’s A Volcano In My Bathtub!

Experiments In Acid-Base Chemistry

What do you get when you mix an acid with a base?

A party!

“It is like the acid and the base like each other so much

that they make the best of bubbly friends.”

This is one way that I explain the fun, interesting chemical reaction of acid/base mixing to little kids. I also make sure we talk a bit about the ph scale; where an acid and a base are on that scale; and how when mixed together, they meet in the middle becoming neutralized.

Mini Bathtub Volcanoes

Mini Bathtub Volcanoes

Acid & Base Fun For Little Ones

~ A Very Simple Experiment ~

Demonstrating this reaction for kids is easy.  Put a spoonful of baking soda in a clear glass then add a bit of vinegar and watch the bubbles!  This is a great time to talk about what exactly is happening inside the glass.

~ Blow Up A Play Dough Volcano ~

Every year we make a volcano at preschool filling it with a mix of baking soda, vinegar and food coloring to create an explosion!  It is always a major hit with the kiddos.  They love watching the volcano erupt over and over and over again.

This year we made our volcano with left over rose bud play dough and blue lava, kid's choice!

This year we made our volcano with left over rose bud play dough and blue lava, kid’s choice!

The coloring started to run out but bubbly white is fun too!

The coloring started to run out but bubbly white is fun too!

Materials ~ 

  • Play Dough, this is the perfect time to use up any old play dough you have lying around.
  • Vinegar, lots of it!  (this is the acid)
  • Baking Soda, lots of this too!  (this is the base)
  • Food Coloring, optional.  For our next volcano I think I will try using  beet powder instead to color our lava.  I love to find natural alternatives to food coloring.
  • A Pan with high sides

Instructions ~ Shape a volcano from play dough in your pan.  Use your hands to form a play dough cone, get the kids involved they love it! After you gather your audience, put some baking soda and coloring inside the volcano then add some vinegar and watch the fun!  If your kids are anything like mine, they will probably want you to blow it up again and again! It is fun to add a few “vents” by poking holes along the side of the volcano so the lava comes out there too.

~ Create Bathtub Volcanos ~

Follow up your volcano with mini bathtub volcanos for the kids to take home with them.  It is the perfect way to extend the learning and the fun!  These really are bath bombs; did you know that fun fizzing of bath bombs is all about acids and bases reacting?  Here is how to make your own! Mini Bathtub Volcanoes Materials ~ 

  • 1 cup Baking Soda
  • 1/2 cup Powdered Citric Acid  (this is the acid)
  • 1/2 cup Epsom Salts
  • about a tablespoon of Witch Hazel
  • 10 to 20 drops of Essential Oils, favorite kid safe options are lavender, sweet orange, rose geranium, cardamom, spearmint and ylang ylang.  We used lavender to keep things simple.
  • 1 teaspoon Oil, like almond, apricot kernel or olive oil .  We used a calendula and lavender infused almond oil.
  • Molds, we used plastic eggs to make tiny volcano shapes; I also brought some soap molds that I have on hand so kiddos could have a choice.

There are lots and lots of bath bomb recipes online.  After researching I decided to based our super simple bath bombs off Mountain Rose Herbs beautiful Rose & Geranium Bath Bombs.

 Instructions ~ First it is really fun to run another simple little experiment with the kids so they know exactly what is happening with these mini volcanos.  Once again we created an acid/base mix in a glass by putting one spoonful of baking soda and a 1/2 spoonful of citric acid in the glass.  And what happened?  Nothing.  Nothing happens until you get water involved.  So we added some water and bubbles! Next we made our volcano bath bombs.  If you are making this with a group of kids, I really recommend practicing because the process is a tiny bit fussy. First, mix all the dry ingredients together making sure to break up any lumps. mixing Carefully add the oil and essential oils while stirring to limit any bubbling action in your bowl. Finally add the witch hazel a bit at a time, again stirring while you go.  I actually put the witch hazel in a spritzer bottle and spray it in to the mixture a couple squirts at a time.  This worked really well for me.  Keep spraying and mixing until the mixture holds together when you squeeze it in your hand. Mold the bombs with the kids by having them tightly pack the mixture into a mold. ~ as I said I brought in a few different shapes to choose from with plastic eggs as one choice.  Using half off a plastic egg creates a little volcano shape.  You can use what ever you have on hand and even just shape them with your hands by squeezing the mixture into whatever shape you want.

Using A Heart Shaped Mold

Making Heart Shapes

Pressing mixture into a plastic egg.

Pressing mixture into a plastic egg.

Let the bath bombs dry for a few days before using.  So the kids don’t miss out on the fun make sure to let them know to get into the tub before they put the bath bomb in because it only fizzes for a minute or so.

Do you have a favorite way to experiment with acids and bases?

Our Volcanoes/Bathbombs  

Shared On: Eco-Kid’s Tuesday, It’s Playtime!, Kid’s Get Crafty, Tender Moments, Kid’s CoopFriday’s Nature Table

Categories: Aromatherapy For Kids, Baths, Essential Oils, Herbs For Kids and Mamas, Lesson Plans For Preschool And Home, Medicine Making, Playing With Herbs | Tags: , , | 7 Comments

The Herbal Sock Bath For Kids

An interactive experience from start to finish, the sock bath is lots of fun to make with children.  What is the sock bath you ask?  I first learned about this great way to use herbs in the tub from my teacher, Brigitte Mars.  To make a sock bath simply put your chosen herbs in a sock, tie a knot in the top and toss it in the tub… super easy!

Having made sock baths a few times with the kids at preschool, I have come to notice that the kids just love them.  They enjoy picking out their very own herbal blend to put in the sock and then they love playing with the knotted sock, snuggling with it and enjoying the scents of the herbs.  Once you get the sock bath into the tub it is great fun to watch the water change color as the herbs mix with the bath water.  And then squeezing all the herb-rich water out of the sock into the bath makes for a very tactile experience indeed.

sock bath herbs

~ Making Sock Baths With Kids ~

The process is a lot like some of the other baths I have shared like, Minty Mint Bath and Rosy Oatmeal Bath, but is tailored for creating with kids.

Materials ~

  • A sock for each child.  When I do this at school, I ask each child to bring in a long clean sock from home, not a kid size one!  You need big socks to stuff!
  • Bath Herbs examples are ~ roses, chamomile, lavender, catnip, calendula, and mints.
  • Oatmeal, this is optional but it makes the bath so very much fun because when the sock bath is all wet in the tub and the child squeezes it, a skin nourishing slippery, milkiness exudes from the sock, so cool!
  • Epsom Salts, totally optional
  • Kid Friendly Essential Oils such as ~ lavender, sweet orange, spearmint, rosemary, rose geranium and ylang ylang.  These are optional too!
  • A Jar or Glass, have one for each child you plan to work with if you are going to do this in a group.  Or you can have one jar/glass if you are going to work with each child separately.  I used a plastic one to prevent problems with breakage.

Method ~

  • Give each child a jar/glass in which to create their sock bath.
  • Working with either one child at a time or a few at a time, have the child(ren) choose the herbs they would like in their sock bath.  Help them place about a 1/8 to 1/4 cup of each herb into their jar or glass.
  • Add oatmeal and epsom salts if desired using about 1/8 to 1/4 cup each.
  • Add the essential oils, about 4 to 8 drops total of whatever combination of oils you are using.  If they want they can stir up their bath with a spoon.

stir it up

  • Then help the child(ren) to place to opening of their sock over the opening of their jar/glass and then once the sock is secure, dump the jar/glass over so the contents fall down inside the sock.  (You might want to have the child hold the sock onto the jar if it is not a tight seal.)  The child(ren) may need to give it all a little shake to get all the bath into the sock.

Filling the sock

  • Once all the bath is in the sock, remove the sock from the jar/glass and tie off the top!
  • You can let the child(ren) play with their sock if you wish.  
  • Let the children’s parents know how to use the bath ~ Just toss it in the tub with the child and let the play begin!  Encourage the child to squeeze their sock bath so they can really smell the herbs and enjoy the wonderful herbed water that comes out of the bath.   

Happy Creative Bathing!

Shared On:  It’s Playtime!, Tender Moments, Eco-Kids Tuesday, The Kid’s Co-op, Make Your Own Monday, The Gathering Spot, Frugal Days, Sustainable Ways, Kid’s Get Crafty, Friday’s Nature Table


Categories: Bathing, Baths, Herbal Crafts And Projects, Herbs For Kids and Mamas, Lesson Plans For Preschool And Home, Medicine Making, Playing With Herbs, Practices For Intentional Living | Tags: , , , | 3 Comments

Herbal Infusions ~ Healthful Simplicity

Nourishing Mama Mission Four ~

Ever heard of herbal infusions?  Like a tea but much better with a stronger nutritive and medicinal action herbal infusions are true nourishment in a cup.  Plus they are easy to make and easy to drink.  What could be better for a busy mama?

This is the fourth pursuit of the Nourishing Mama Mission and if done regularly over time it is very powerful indeed.

Herbal infusions are incredibly useful for providing the body with easy to assimilate nutrition.  Infusions differ from tea because the plant material is steeped for a much longer period of time than a regular cup of tea.  This allows for all the medicinal constituents including vitamins and minerals to be liberated from the herb.  Regular drinking of infusions over time provides a strong base and deep nutrition for the body.  You can drink 2 to 4 cups infusion every day or even just a couple of days a week as a way to support yourself.

Red Clover Blossom


~ Herbs To Use ~

When making and drinking infusions it is best to use gentle, nutritive and tonifying herbs which act mostly as food for the body.  A great way to start working with herbal infusions to start by infusing and drinking one herb at a time.  This gives you a chance to really get to know each herb.  How does it feel in your body?  What does it really taste like?

Good Herbs To Start With Are ~

Stinging Nettle ~ Urtica dioica

This is a highly nutritive plant that stimulates blood flow and is a body wide tonic with an affinity for the kidneys and adrenals.  Nettle’s high vitamin, mineral and chlorophyll content feeds the endocrine glands, builds the blood, provides essential nutrients for a stressed out nervous system and nourishes the liver.  It will strengthen and revitalizes weak kidneys thereby increasing energy.   It’s high amounts of iron and calcium increase hemoglobin in the blood encouraging increased oxygen transport to tissues.  It is high in vitamin K which facilities proper blood clotting.  Nettle activates the metabolism, therefore assisting in the absorption of the very nutrients it provides!  It is an astringent plant that tightens and firms tissues.  This action arrests bleeding and discharge from tissues, increasing their health and strength.

Oatstraw ~ Avena sativa

Oat is a nutritive herb that soothes and protects the nervous system by providing essential vitamins and minerals.  Oat creates a sense of well being, supporting the emotions and integrity of the individual.  Indicated for nervous debility or exhaustion with depression; fatigue, even with a good sleep; dark circles under the eyes; heart palpitations when pushing too hard; and/or stimulant abuse.  It is beneficial for those who have suffered sexual abuse and trauma, resulting in sexual debility.  One quart of infusion drunk daily will provide powerful benefits.

Red Raspberry Leaves Rubus spp. (idaeus, strigosus, parviflous)

The leaves of this plant make a delicious infusion, which is high in vitamins and minerals: especially calcium, iron, phosphorus, potassium and vitamins C, B and E.   Raspberry leaf is an energetic tonic for the reproductive organs..

Red Clover Blossoms ~ Trifolium pratense

This beautiful and commonly occurring ‘weed’ is a phytosterol, alterative and nutritive.  Red clover is a phytosterol with estrogenic activity.  Because of this, it acts as a defense against xenoestrogens (detrimental estrogens that occur in the environment as a result of pollution) by competing for estrogen binding sites.  In fact my teacher Feather Jones explained to us that red clover also aids in creating a more powerful estrogen cycle.  Red clover is highly nutritive with good quality, easily absorbable vitamins and minerals, proteins, fatty acids and flavinoids.  All of which nourish the whole body: particularly providing vitamins for the uterus; minerals for the glands, which act to equalize hormonal activity and relax the nervous system.  It also contains coumarins that decrease blood viscosity, hence increasing blood flow throughout the body.  Do not take red clover for the first trimester of pregnancy or exceed two quarts of infusion per week during the later part of pregnancy due to its phytoestrogenic properties.  Also, when buying red clover look for purple flower tops with a minimal amount of leaves.

Alfalfa ~ Medicago satvia

This amazing plant has a tap root that reaches a full 100 feet down deep into the rich depths of Mother Earth bringing up mineral rich goodness right into it’s leaves and stems.  Infusion made with alfalfa gives all the wonderful nutrition brought up from way down deep into the cup.  Known as “The Father Of All Foods,” alfalfa is a highly nutritive herb bringing health the body by feeding it well.

Chamomile ~ Matricaria spp.

Chamomile is a soothing and relaxing herb that contains high amounts of vitamins and minerals such as calcium, magnesium, phosphorus, vitamin B-2, and flavinoids.  It helps relieve anxiety and stress as well as pain and irritation in the gut, being particularly useful for flatulence and indigestion.  Chamomile is also helpful for restlessness and insomnia.   It steadies those suffering from nervous debility.  Drinking chamomile infusion before nursing will impart these wonderful qualities to the breast milk and can help sooth an irritated child and alleviate some of the stress of colic.  If you are making an infusion of chamomile, only steep for 3 to 8 minutes as it will become very bitter.   Don’t worry, this one is still very effective with the short brewing time.  People who are sensitive to ragweed maybe be allergic to chamomile.

 
Red Raspberry Leaf

Red Raspberry Leaf

~ Making Your Infusion Brew ~

Place 1 large handful of dried herb in a canning jar (using up to 1 ounce of herb per quart of liquid, experiment with your tastes).  Cover with hot or cold water, place a cap on top and let steep for at least  4 hours and then strain.  You can dilute your infusion with water or juice, or add honey to taste.  I usually make my infusions before going to bed and then strain the infusion the next morning into a bottle I can carry around with me during the day.  Please be sure to use appropriate containers such as canning jars as they will not break when exposed to the high heat of boiling water.  You can make extra quantities ahead of time and store them in the refrigerator for 1 to 2 days.  If your infusion takes on an unusual smell or begins to bubble it has gone bad.  Unused leftovers can be given to plants as a superb growth tonic, and the spent herbal matter makes excellent compost.

Chamomile Flowers

~ Infusion Blends ~

Once you get the hang of making and drinking infusions you may decide to try blending your favorites together to create fun tasty combinations.

Here are some of my favorite blends:

  • Oatstraw & Lemon Balm ~ Simply add a small handful each of oatstraw and lemon balm in a jar.  Cover with water, steep for at least four hours and strain.  This is my favorite infusion right now!
  • Raspberry, Nettle & Spearmint~ Put a small handful each of raspberry leaf and nettle leaf in a jar and a few pinches of spearmint leaf.  Cover with water, steep for at least four hours and strain.  Play with the quantities of herbs to adjust to your taste.
  • Raspberry, Oatstraw & Chamomile ~ Put a small handful each of raspberry leaf and oatstraw in a jar, fill halfway with water and let steep for at least four hours.  About 15 minutes before you are ready to strain the infusion add a small handful of chamomile flowers and fill the jar to the top with hot water.  Let steep for up to 15 minutes and strain.  Add honey if this brew is to bitter.

Look for more tasty infusion recipes in the coming days and weeks.

Blessings and Love!

More Nourishing Mama Mission…

Mama On A Mission ~ Introduction

Nourishing Mama Mission One ~ Cultivating Sacred Space 

Nourishing Mama Mission Two ~ Attitude of Gratitude ~ The Start of the Day

Nourishing Mama Mission Three ~ The Art of Bathing


For more information on using herbs safely check out my guest post on

Natural Living Mama “Herbal Medicine Safety Considerations” 


Categories: Herbal Tips And Tricks, Infusions, Mama Care And Empowerment, Medicine Making, Natural Family Care, Nourishing Mama Mission, Parenting, Practices For Intentional Living | Tags: , , , | 3 Comments

Sleepy Time Foot Balm For Kids

Who doesn’t like a good foot massage?  A nice rub is especially relaxing before bed.  Massage oils and balms made with essential oils massaged into the bottom of feet at bedtime helps to induce sleep as well as fight infection.

tooties

Did You Know ~ Our bodies are able to absorb a phenomenal amount through the skin on the bottom of our feet.  In fact an old remedy for coughs is to put rub the bottom of the feet with olive oil, put minced garlic on top of the oil and then put socks over the whole thing.  Within a very short amount of time the person’s breath will smell of garlic!  The garlic then helps to fight infection from the inside of the lungs out as the person breathes.


Creating Foot Balms With Kids ~ 

What is better than squishing and squeezing a bag of gooey goodness?  This is just what we did recently at preschool.  The kids each created their own sleepy time foot balm in a little baggie for mixing.  Originally we were going to use tins to put the balms in but what fun is that?

squishing foot balm

Gosh, their little hands were so busy, I had a hard time getting a clear picture! But you get the idea right? Squishing up stuff in a bag is super fun!

Materials ~

  • Shea Butter
  • Coconut Oil (optional)
  • Relaxing Essential Oils, Some Examples Are ~
    • cedarwood
    • lavender
    • petitgrain
    • sweet orange
    • ylang ylang
    • vetivert
    • sandalwood
    • frankincense
    • rose geranium

Instructions ~

  • Place a big spoonful (about a tablespoon) or two of the shea butter and coconut oil in a baggie.  
  • Let the children smell the essential oils and pick out a couple of their favorites that make them feel relaxed and sleepy.  
  • Add these essential oils to the shea butter/coconut oil blend.  Because this is a really loose project with no exact measurement for the shea butter/coconut oil blend, I errored on the side of too little essential oil, to be safe, rather than risk using to much.  So I used up to 6 drops of essential per baggie.  This means that if the child choose lavender, cedarwood and ylang ylang for the essential oils, I put 2 drops of each oil in their baggie for a total of 6 drops.  See Essential Oils for more information on using them herbal preparation safely.
  • Seal the bag shut tight!
  • Now for the fun part… Mixing it all up!  It is the child’s job to mix up all that goodness by squishing it around to their heart’s content!

squeezing foot balm

To Use ~

At bedtime rub a little bit of the balm on the bottoms of your child’s feet.  This is  a great time to connect with a little massage and conversation or lullaby.  Then cover your child’s feet with socks.  Off to slumber land they go!

More~ 

Nightmares And Night Terrors, What’s A Mama To Do?

Categories: Aromatherapy For Kids, Essential Oils, Foot Rubs And Soaks, Healthy Sleep, Herbal Tips And Tricks, Herbs For Kids and Mamas, Lesson Plans For Preschool And Home, Mindful Self Care, Parenting, Playing With Herbs, Practices For Intentional Living | Tags: , | 7 Comments

Create a free website or blog at WordPress.com.